I made this conversion for my Blaupunkt Manheim Radio (but it may work for others) using 3D printed parts I designed and a Bluetooth Amplifier PCB.
Do not attempt this if you are not good with electronics or don’t want to damage your radio.I take no responsibility for any damage you cause, Ensure you use the correct gauge wires and add an external fuse.
I used this Bluetooth Amplifier PCB https://amzn.to/444DJby but any similar one should work, be sure to check reviews as the first version I bought wasn’t as good quality as this one.
Strip the radio, removing the old PCB and controls. leave the buttons and display in place.
Move the Volume pot into the Tuning pot position.
Mount the PCB Bracket using the original Tuner collar and nut.
Heat the end of the shaft adapter for a few seconds and push onto the shaft of the new volume pot, when cool thread the shaft through the hole.
Screw PCB into the adapter.
Finally wire up the new PCB, I didn’t use the supplied cable, I soldered 12v and Gnd feeds to the PCB.
Ensure you fuse it externally, I cannot stress this enough.
You can wire the original bulb up to the 12v feed or replace it with some LED strip as I did, be sure to only give the radio a switched 12v supply and don’t leave unattended when in use.
I am really pleased with mine and have used it for thousands of miles now, I would thoroughly recommend good quality speakers (I used these JBLs in kick panels https://amzn.to/4ksJANA ) as this makes a world of difference, I also fitted an sub under the rear seat (this one https://amzn.to/3T97d1B ) wired into the speaker outputs, I recommend taking a feed from the coil to the remote power input as the auto detect power isn’t great.
Last year I bought a new fun car, after some back and forth I settled on a 66 Beetle.
This is the third beetle I’ve owned (EER 439D), previously having a 1972 early looker (EJN 484K) with 1600cc Single port engine and a 1977 1200cc (SRT 969R) both of which were my daily drivers and I covered many thousands of miles in them.
My Old Bugs:
This one left the factory in 1965 and is a 1966 1300cc model, it featured in Volksworld in 1994 and had a load of work done to it in 1998, It was “restored” around 2009/2010 and fitted with a large race engine however since then it’s barely covered any miles.
1994 Volksworld and the original restoration:
1998 – 59,998 miles – Receipts from LR super beetles show that it had a lot of work this year. 2010 – 70,337 miles – Fully restored, body off and resprayed as race car with large engine fitted. 2012 – 70,469 miles – MOT Mileage. 2024 – 70,658 miles – When I purchased it!
I bought it with a few issues that needed sorting before it hit the road, the massive engine and rear suspension had been removed prior to my purchase, the supplied axles were wrong and the brakes looked like they came from the bottom of the sea.
I also had some of the scratches touched up and the heating reinstated which had been welded up, I had a 1600 TP engine (originally from a late Mexican Beetle) fitted with twin 34 ICT webbers.
Thanks to DK Autos in biggleswade for getting it back on the road and Julian at parts emporium for supplying many missing items It’s now a lovely car which is fun to drive, has good heating and has a great interior. I’ve already driven more miles in the last few weeks than it has covered in the previous 14 years.
Here I will document my Automatic RWD Zetec conversion it is not a guide nor advice, just a record of how I converted a FWD zetec engine to a RWD Automatic with a few extras I learnt along the way thrown in.
Engine:
I’m using a 2.0 blacktop zetec from a 1999 Mondeo with a Ford focus EFI and ECU from 2001 and a Ford C3 Automatic Transmission from a 1975 2.3 Mustang.
To RWD convert this it has a Sierra sump and oil pickup fitted. I’ve opted for the retro ford alternator kit and will be using their DIY mount kit as well.
As space isn’t an issue in my application I’m using the original thermostat housing so no need for a water rail.
Transmission:
I’m using a Ford C3 Automatic Transmission originally from a 2.3 Mustang with a Mondeo automatic flexplate (135 tooth, 11.3″) and Mondeo automatic crank sensor. The A4LD box was also an option but I wanted the simplicity of the C3 transmission.
I had a local engineering firm drill the TC mounting holes in the flexplate using a lathe to get them spot on.
There are at least 3 bellhousings for the C3 box which will fit on the zetec and all these need the smaller 3 bolt torque converter as the 4 bolt version fouls on the zetec timing gear.
2.3 Mustang bellhousing bolts straight up to the zetec but requires the correct Mustang starter (1974-1985) or an adapter for the sierra starter and the smaller British TC.
1.6 Crossflow bellhousing (Escort etc) this bellhousing requires the smaller TC and a Sierra DOHC starter but as it’s considerably deeper than the pinto one you will also need a spacer between the TC and flexplate (approx 10mm), the starter is on the opposite side to the others.
2.0 Pinto bellhousing (Cortina etc) Although I’ve not tested this myself I’m told it’s the same depth as the Mustang one so should bolt straight up using the smaller TC and the sierra DOHC starter.
When originally fitting the Torque Converter I didn’t have it seated properly, A tip given to me was to smear a line of grease on the rear end of the TC that way you can ensure its fully located as after removal you can see how far the rear seal came up the TC!
2.3 C3 Transmission with 3 bolt TC and Mondeo Flexplate
The Automatic flexplate bolts are different to the manual flywheel ones and have been discontinued by ford, luckily retro ford had some in stock. They are a class 10.9, M11 X 1.0 pitch bolt, the thread is 15mm long with a 2mm shank, they have an 18mm hex head which is 6mm tall.
Automatic Zetec Flywheel bolt
Starter motor spacer: Whatever the transmission you’ll need to space your starter so it engages and disengages properly with the Mondeo flexplate.
With a sierra starter I found a 10mm spacer was needed and the same with the Mustang however I made an adapter plate so I could fit a sierra starter on instead of the OG Mustang one.
The flexplate teeth sit approximately 8-18mm from the sandwich plate.
Starter motor adapterComplete engine fitted
Hopefully this helps someone and I’ll try and finish the write up at some point.
Thankyou Neil for all your help and encouragement along the way.
I wanted to replace the accelerator rod setup on my 64 Econoline with a cable one so I built this very simple adapter to use the existing pedal assembly, since these photos I have changed the washer and spring setup to look a little neater but it works incredibly well.
I fitted a pair of Rivnuts to the front valence and bolted the bracket to them, the original pedal arm on the assembly rests on the bracket and I used a bolt to attach the cable end and spring to the original assembly arm.
This is the bracket, its very simple but effective!
This post is about my personal experience with fitting the D&D brake and master cylinder conversion kits on an early ford Econoline, it is not a guide and I take no responsibility for anything you learn here. I fitted this with a mate and couldn’t have done it alone.
Overall I am very pleased with the kits, my van now stops straight and perfectly everytime I feel so much safer driving it however the instructions are somewhat lacking and miss a few key points.
General Notes:
I chose to powder coat my brackets, they are well made items but unpainted and personally I don’t want mine rusting away under the van.
DO NOT USE A PRESS for any of the installation, it isn’t needed and will do more damage than good.
Disk conversion kit:
1. If you press the studs out of the drums you risk destroying the hubs, so remove the drums you will need to cut the “Swage” from around the studs, to do this I used a bench drill with a 5/8″ hole cutter and the pilot drill removed, I ran the stud inside the hole saw and it cut the studs out perfectly. But make sure you don’t go too far as you will either damage the hubs or shatter the hole saw.
Once these are drilled out tap the hub from the drum with a hammer.
2. It is imperative that the holes in the Jeep disks are 5/8″ unfortunately due to manufacturing tollerances this cannot be assumed so ream or drill out these holes to 5/8″ (16mm) mine were close but not all uniformed. The kit would not assemble correctly without drilling these out.
3. Do not press the new studs in, tap them in with a hammer, in fact you don’t need a press for this kit at all! If you press them in you risk damaging the hubs and shattering the new disks.
I would suggest laying a wheel on the bench, assembling the components (studs, disks and hubs) tapping the studs through and tightening them up with wheel nuts, this will make sure that the whole lot goes together true.
4. While you have your van in the air and in pieces clean your suspension components and grease your kingpins, it will significantly improve the ride.
5. The recommended brake hoses do not fit they are too short, we simply relocated the the brackets to the chassis and welded them in however I am told that the 4WD S10 Blazer flexi’s are longer and may work.
The completed disk conversion with relocated flexi hose bracket:
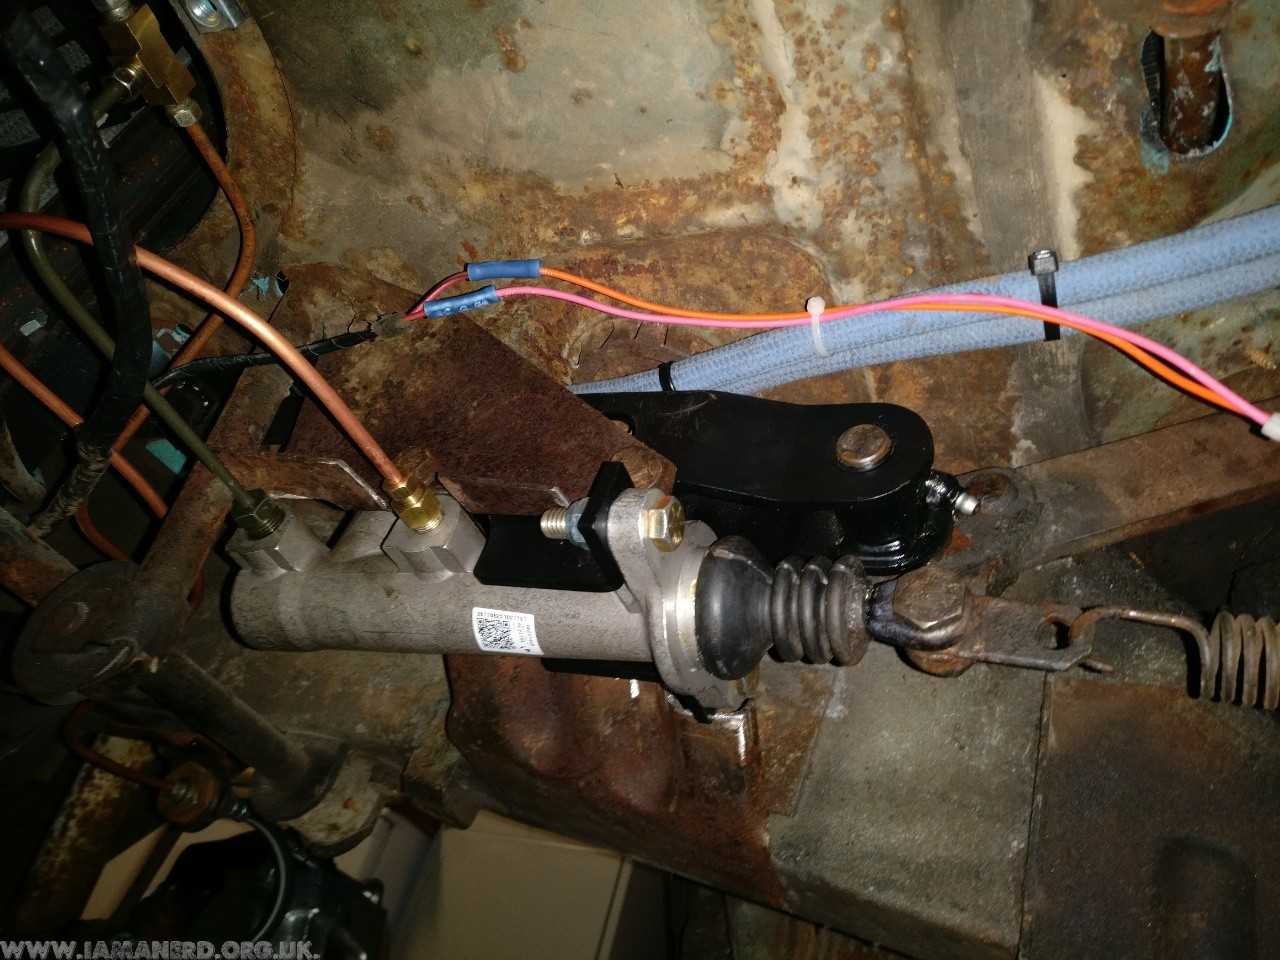
Master cylinder kit:
1. With the supplied cylinder the larger port goes to the rear brakes this at the rear of the vehicle when fitted and the smaller to the front (the one at the pushrod end). D&D supply a short adapter hose for the rear brakes which we put a proportioning valve on and ran straight to the rears but in theory you don’t need this and could just use a straight coupler.
If I were to do this again though I’d use a T-piece sending one line to the rears and one to a brake pressure switch binning the mechanical switch supplied.
The front outlet comes with an adapter to make it work with a standard inverted flare 3/8 fitting which I ran to a T-piece sending one line left and one right.
2. The aluminium turned caps just need pushing into the master cylinder gently until you feel resistance, they don’t need to be pushed all the way in as it’s a low pressure feed, try to source angled hose barbs for these. I cut down straight ones.
3. I fitted my resorvoir in the cab, I drilled a couple of holes in the cab floor and ran the hoses up to a resorvoir behind the front panel.
You need brake feeder pipe between the reservoir and the master cylinder, do not use fuel hose or anything else it will perish. I bought aircooled vw beetle hoses as they are readily available but summit do sell it.
Make sure there are no kinks or tight bends in the hose so the fluid can fall down to the master cylinder.
4. My pedal free play was massive, I understand there should be around 1mm free play at the master cylinder but even with the eccentric nut this was too much giving a very floppy pedal, We added 5mm to the pushrod by welding a section of M8 bolt shaft in which solved it. Obviously you may not have this issue and if you do you’d need to calculate the correct length yourself.
5. Bleeding, bleeding bloody bleeding! when fitting these kits I replaced everything front and back, shoes, pipes, cylinders, flexi’s the lot which meant lots of air and bleeding was an absolute ass, we ended up backfeeding fluid with a syring into the front lines to get it to start bleeding so I’d suggest following the advice and bench bleeding the MC beforehand.
Completed master cylinder kit:
I hope this post helps someone as this is a great way to add some stopping power to your 1961-67 Econoline.
Here is my latest acquisition (RCA 323B), I sold the Cortina and bought this 64 Econoline, its the second I’ve owned and was originally a 240ci straight six with a 9″ rear but is now a 302 V8 with C4 automatic from a Mach 1 Mustang.
I have been working to finish it, make safe and do a good job of. It’s taken a hell of a lot longer than I expected for a “running road legal vehicle” but there was so much that needed doing/redoing to make it safe, I’ve pretty much finished the engine mechanical side but it still needs allot of work and at some point an interior and paint.
Here are a few pictures, it’s pretty bare atm with little to no interior but it goes like a rocket and is noisy as all hell it came in on its US plate (58 129 T).
Originally a 1600L this car had a 2ltr Sierra engine and type 9 gearbox professionally fitted around 10 years ago. Its a nippy car that Runs perfectly with a progresive webber and stainless exhaust.
Its stock height and besides the inertia seatbelts its the Original Interior, they are also the original wheels.
The suspension has been poly bushed and it has adjustable tension Gas Shocks fitted giving it great road handling compared to the standard cortina, however its still really comfortable for day to day driving.
It is in great condition generally and has been resprayed at some point in its life, it does need a small repair to a wing, one sill and rear arches (not MOT fails) but it comes with brand new sills and rear arch repair panels, I had planned on getting these done but never got round to it as they really aren’t that bad.
So you want to fit front and rear inertia seatbelts in your Mk3 ford Cortina? Well it’s relatively easy and here is how I did it!
The fronts are a simple straight swap but its worth mentioning that they should have a long solid buckle link as otherwise they don’t do up if you are a little on the large side and the inertia reel needs to function vertically, I just bought generic three point inertia seatbelts online.
The rears need to be a three point type but without the extra top guide so that the inertia reel sits on the parcel shelf and functions horizontally, they also need short webbing buckles.
Originally I bought some securon rear seatbelts which were apparently Cortina fit however the webbing on the buckles was too long so they fouled on our child seat. I ended up buying generic intertia seatbelts online and removing the top guides.
Seatbelt mounting holes are already there under the rear seats, the reel itself sits on the parcel shelf and bolts through the holes already in place. I also added some extra very thick large seatbelt mount washers for added security!
Well here it is, the new responsible family car my four door mk3 cortina in evergreen (NME 377L).
Originally a 1600L but now running a 2ltr ohc pinto engine from an 80s Sierra.
It is lowered on its original steel wheels and has had an Alfa Romeo leather interior fitted (it came with the original interior and springs if I want to put it back to stock at some point) and I have fitted front and rear inertia seatbelts
It’s a one year only car with the washer pump and intermittent wiper switch mounted on the floor.
1967 Electric sunroof Type 34 Razoredge Karmann Ghia.
I recently decided it was as time to part with the razor, its leaving me this weekend and below is a little information about the car from the advert I made.
This car is a 1967 model Electric Sunroof Ghia which was built in 1966 and originally purchased in Belgium as a LHD car but was converted sometime in the 70’s to RHD. I bought it in 2010 and unfortunately it fairly rapidly fell to pieces having been bodged beyond belief by previous owners, between 2011 and 2012 it underwent serious body off repairs and some restoration work at PanelKraft.
The Chassis was fitted with a pair of brand new KlassicFab type 3 floorpans and any rust was taken care of, it was then sandblasted back to bare metal before being powdercoated. It was fitted with new brake lines and a new master cylinder plus new pads, shoes etc. The rear shocks were replaced and a replacement IRS sub-frame was sourced and fitted as the original one had been interestingly modified. It still has the original front beam which is tatty but solid.
Its Running on American Eagle 2ltr Porche Replica Alloys with modern Continental Tyres all round with lower profile Tyres on the front. I do also have a set of steel wheels that came with it which can be included.
The Body has no rust in it at all but is does have a fair amount of filler. Having been in Britain for many years the panels have had some patches welded in over the years and filler to smooth it out, To be honest it has had some fairly terrible welding done in the past which was uncovered when the interior was sandblasted I have had this bad welding rectified along with any rust before it was painted. The factory fitted sunroof works fine although its missing the dust seal and vanity panel, Its finished in a custom 2 pack Blue paint with matting agent giving it the satin finish which just looks lovely.
The bumpers are in excellent condition with only two very small dents, these are originals and took me a long time to source.
The front seats are Porsche tombstones which are incredibly comfortable and I believe are from a 924, these have been re-trimmed in black vinyl with blue piping the original rear bench seat has been trimmed to match, The carpet set is from spirit of the 50s.
It has an Empi Shifter, a Mooneyes steering wheel and Chrome Dash Knobs but besides these the rest is all standard and I believe there is nothing missing although the radio doesn’t seem to work and the glovebox liner is missing.
The car has been completely rewired with modern fuses, relays etc.
The Engine is an AN code 1800cc flat four motor from a Porsche 914 which is reported as being around 90bhp, it has a pair of rebuilt Solex 36-40 PDSIT carbs and runs like a dream. It has type 4 heat exchangers fitted and takes very little time to warm up although to turn the heating on or off does require the pipes to be added or removed so must be done while stationary.
The car pulls amazingly and it a lot of fun to drive, it corners beautifully and brakes well, it is a very comfortable drive and I absolutely love it.
when I originally got it the reg was JLX 134K but I had an age related plate assigned to it PBY 417D.
The only negatives to my knowledge are that the bodywork is not perfect, it looks great but it does have patches welded in rather than replacement panels and a fair amount of filler under the paint. I don’t think this needs rectifying straight away but it will need sorting eventually I like to be entirely honest when selling a vehicle and if I didn’t mention it i’d feel terrible. It also has a few scratches and dinks in the paintwork (Carpark damage) but you don’t really notice them unless you look up close. It is not stock, It does not have all the correct trim parts and it is nowhere near concourse but it isn’t that kind of car.
Click on pictures below for larger versions
Manage Consent
To provide the best experiences, we use technologies like cookies to store and/or access device information. Consenting to these technologies will allow us to process data such as browsing behavior or unique IDs on this site. Not consenting or withdrawing consent, may adversely affect certain features and functions.
Functional
Always active
The technical storage or access is strictly necessary for the legitimate purpose of enabling the use of a specific service explicitly requested by the subscriber or user, or for the sole purpose of carrying out the transmission of a communication over an electronic communications network.
Preferences
The technical storage or access is necessary for the legitimate purpose of storing preferences that are not requested by the subscriber or user.
Statistics
The technical storage or access that is used exclusively for statistical purposes.The technical storage or access that is used exclusively for anonymous statistical purposes. Without a subpoena, voluntary compliance on the part of your Internet Service Provider, or additional records from a third party, information stored or retrieved for this purpose alone cannot usually be used to identify you.
Marketing
The technical storage or access is required to create user profiles to send advertising, or to track the user on a website or across several websites for similar marketing purposes.