When I built my Replicator 2X using a BTT SKR 1.4 Turbo I was disappointed to learn that only one of the three fans is controllable.
Makerbot Replicator 2X with BTT SKR
I really wanted an automatic extruder fan and with an external MOSFET it’s a really simple thing to setup.
DF Robot MOSFET
All you need to do is connect a MOSFET to a spare pin (I chose the power detect plug).
Using a DFRobot GRAVITY MOSFET (other brands are available) I connected the red to 5v, black to GND and green to pin 1.00
Pwr Detect plug
I connected the fan to the output of the mosfet using the output from fan1 for the VIN but you could obviously use your PSU aswell (Make sure this is the correct voltage for the fan!!)
In configuration.adv I changed the extruder fan pin to “P1_00” from “-1” compiled Marlin, uploaded it and bingo!
Here I will document my Automatic RWD Zetec conversion it is not a guide nor advice, just a record of how I converted a FWD zetec engine to a RWD Automatic with a few extras I learnt along the way thrown in.
Engine:
I’m using a 2.0 blacktop zetec from a 1999 Mondeo with a Ford focus EFI and ECU from 2001 and a Ford C3 Automatic Transmission from a 1975 2.3 Mustang.
To RWD convert this it has a Sierra sump and oil pickup fitted. I’ve opted for the retro ford alternator kit and will be using their DIY mount kit as well.
As space isn’t an issue in my application I’m using the original thermostat housing so no need for a water rail.
Transmission:
I’m using a Ford C3 Automatic Transmission originally from a 2.3 Mustang with a Mondeo automatic flexplate (135 tooth, 11.3″) and Mondeo automatic crank sensor. The A4LD box was also an option but I wanted the simplicity of the C3 transmission.
I had a local engineering firm drill the TC mounting holes in the flexplate using a lathe to get them spot on.
There are at least 3 bellhousings for the C3 box which will fit on the zetec and all these need the smaller 3 bolt torque converter as the 4 bolt version fouls on the zetec timing gear.
2.3 Mustang bellhousing bolts straight up to the zetec but requires the correct Mustang starter (1974-1985) or an adapter for the sierra starter and the smaller British TC.
1.6 Crossflow bellhousing (Escort etc) this bellhousing requires the smaller TC and a Sierra DOHC starter but as it’s considerably deeper than the pinto one you will also need a spacer between the TC and flexplate (approx 10mm), the starter is on the opposite side to the others.
2.0 Pinto bellhousing (Cortina etc) Although I’ve not tested this myself I’m told it’s the same depth as the Mustang one so should bolt straight up using the smaller TC and the sierra DOHC starter.
When originally fitting the Torque Converter I didn’t have it seated properly, A tip given to me was to smear a line of grease on the rear end of the TC that way you can ensure its fully located as after removal you can see how far the rear seal came up the TC!
2.3 C3 Transmission with 3 bolt TC and Mondeo Flexplate
The Automatic flexplate bolts are different to the manual flywheel ones and have been discontinued by ford, luckily retro ford had some in stock. They are a class 10.9, M11 X 1.0 pitch bolt, the thread is 15mm long with a 2mm shank, they have an 18mm hex head which is 6mm tall.
Automatic Zetec Flywheel bolt
Starter motor spacer: Whatever the transmission you’ll need to space your starter so it engages and disengages properly with the Mondeo flexplate.
With a sierra starter I found a 10mm spacer was needed and the same with the Mustang however I made an adapter plate so I could fit a sierra starter on instead of the OG Mustang one.
The flexplate teeth sit approximately 8-18mm from the sandwich plate.
Starter motor adapterComplete engine fitted
Hopefully this helps someone and I’ll try and finish the write up at some point.
Thankyou Neil for all your help and encouragement along the way.
Press to Continue were a Ska punk band from North Hertfordshire, originally comprising of four members Tim with his voice, Joe on bass, Ryan hitting drums and Tom playing guitar. They were later joined by Amie on vocals and Luke on sax with a brief stint from drummer Jordan.
I wanted to replace the accelerator rod setup on my 64 Econoline with a cable one so I built this very simple adapter to use the existing pedal assembly, since these photos I have changed the washer and spring setup to look a little neater but it works incredibly well.
I fitted a pair of Rivnuts to the front valence and bolted the bracket to them, the original pedal arm on the assembly rests on the bracket and I used a bolt to attach the cable end and spring to the original assembly arm.
This is the bracket, its very simple but effective!
This post is about my personal experience with fitting the D&D brake and master cylinder conversion kits on an early ford Econoline, it is not a guide and I take no responsibility for anything you learn here. I fitted this with a mate and couldn’t have done it alone.
Overall I am very pleased with the kits, my van now stops straight and perfectly everytime I feel so much safer driving it however the instructions are somewhat lacking and miss a few key points.
General Notes:
I chose to powder coat my brackets, they are well made items but unpainted and personally I don’t want mine rusting away under the van.
DO NOT USE A PRESS for any of the installation, it isn’t needed and will do more damage than good.
Disk conversion kit:
1. If you press the studs out of the drums you risk destroying the hubs, so remove the drums you will need to cut the “Swage” from around the studs, to do this I used a bench drill with a 5/8″ hole cutter and the pilot drill removed, I ran the stud inside the hole saw and it cut the studs out perfectly. But make sure you don’t go too far as you will either damage the hubs or shatter the hole saw.
Once these are drilled out tap the hub from the drum with a hammer.
2. It is imperative that the holes in the Jeep disks are 5/8″ unfortunately due to manufacturing tollerances this cannot be assumed so ream or drill out these holes to 5/8″ (16mm) mine were close but not all uniformed. The kit would not assemble correctly without drilling these out.
3. Do not press the new studs in, tap them in with a hammer, in fact you don’t need a press for this kit at all! If you press them in you risk damaging the hubs and shattering the new disks.
I would suggest laying a wheel on the bench, assembling the components (studs, disks and hubs) tapping the studs through and tightening them up with wheel nuts, this will make sure that the whole lot goes together true.
4. While you have your van in the air and in pieces clean your suspension components and grease your kingpins, it will significantly improve the ride.
5. The recommended brake hoses do not fit they are too short, we simply relocated the the brackets to the chassis and welded them in however I am told that the 4WD S10 Blazer flexi’s are longer and may work.
The completed disk conversion with relocated flexi hose bracket:
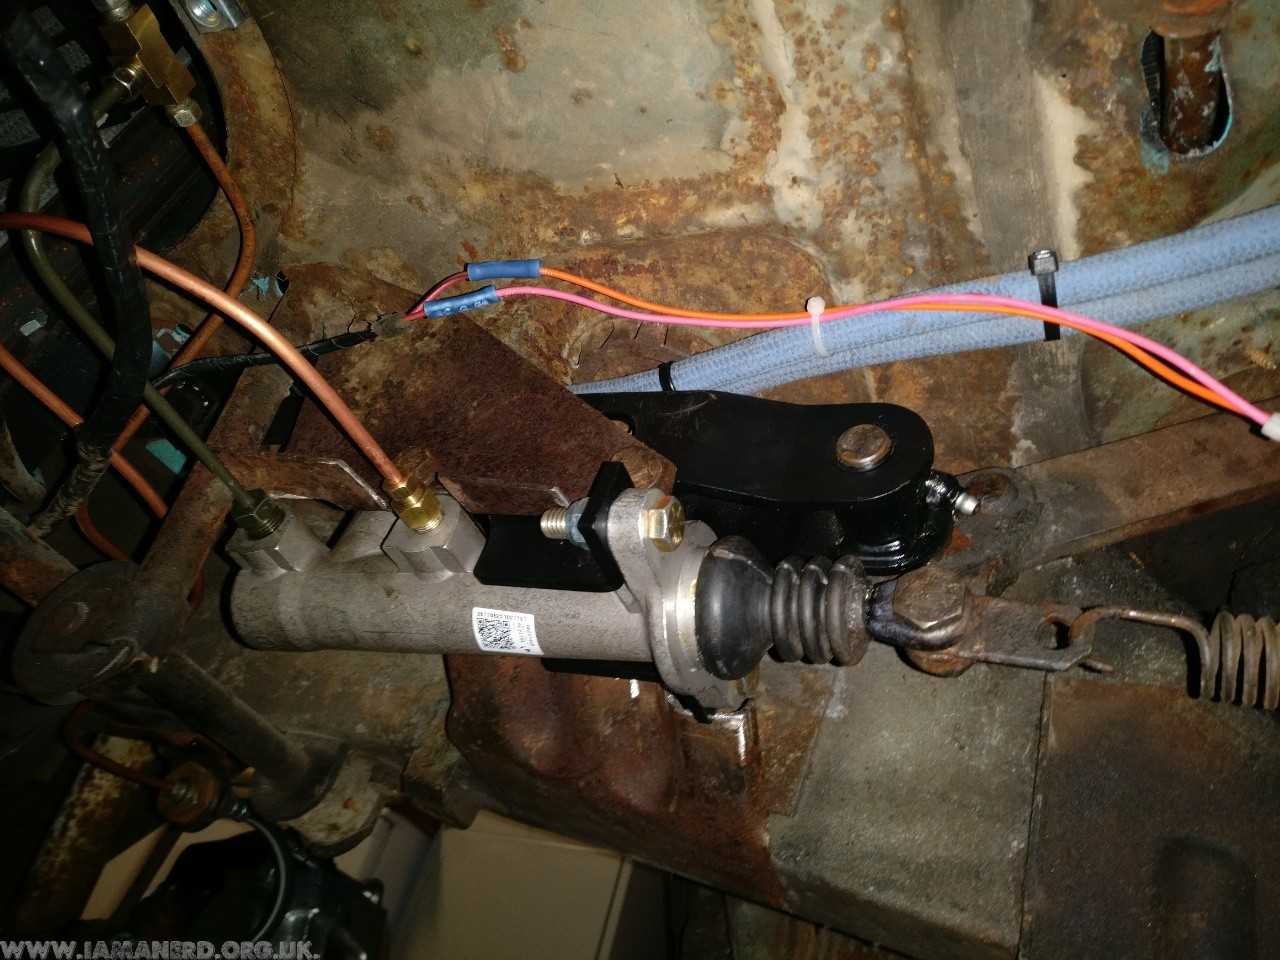
Master cylinder kit:
1. With the supplied cylinder the larger port goes to the rear brakes this at the rear of the vehicle when fitted and the smaller to the front (the one at the pushrod end). D&D supply a short adapter hose for the rear brakes which we put a proportioning valve on and ran straight to the rears but in theory you don’t need this and could just use a straight coupler.
If I were to do this again though I’d use a T-piece sending one line to the rears and one to a brake pressure switch binning the mechanical switch supplied.
The front outlet comes with an adapter to make it work with a standard inverted flare 3/8 fitting which I ran to a T-piece sending one line left and one right.
2. The aluminium turned caps just need pushing into the master cylinder gently until you feel resistance, they don’t need to be pushed all the way in as it’s a low pressure feed, try to source angled hose barbs for these. I cut down straight ones.
3. I fitted my resorvoir in the cab, I drilled a couple of holes in the cab floor and ran the hoses up to a resorvoir behind the front panel.
You need brake feeder pipe between the reservoir and the master cylinder, do not use fuel hose or anything else it will perish. I bought aircooled vw beetle hoses as they are readily available but summit do sell it.
Make sure there are no kinks or tight bends in the hose so the fluid can fall down to the master cylinder.
4. My pedal free play was massive, I understand there should be around 1mm free play at the master cylinder but even with the eccentric nut this was too much giving a very floppy pedal, We added 5mm to the pushrod by welding a section of M8 bolt shaft in which solved it. Obviously you may not have this issue and if you do you’d need to calculate the correct length yourself.
5. Bleeding, bleeding bloody bleeding! when fitting these kits I replaced everything front and back, shoes, pipes, cylinders, flexi’s the lot which meant lots of air and bleeding was an absolute ass, we ended up backfeeding fluid with a syring into the front lines to get it to start bleeding so I’d suggest following the advice and bench bleeding the MC beforehand.
Completed master cylinder kit:
I hope this post helps someone as this is a great way to add some stopping power to your 1961-67 Econoline.
After successfully running for 18 months my SD card failed probably due to the amount of mysql data read/writes. Luckily it failed read only so I didn’t loose too much data however I decided to start fresh using rasbian stretch and an external mysql table on a traditional drive (Not an SD Card) so here is a little guide of what I did again it assumes you have no mouse, keyboard or monitor attached and is correct as of December 2017
Prepare the Pi:
1. Download the latest Raspbean Stretch Image and Using your favourite method, prepare your SD card using the downloaded image for the Pi (I used Etcher on my laptop).
2. Add an empty file to the boot folder called “SSH”
3. Plug an ethernet cable into the Pi and connect to a router serving DHCP and Boot your Pi using the newly prepared SD card.
4. Using a network scanner (or login to your router) to determine the IP address of your Pi, I use fing on my smartphone.
5. Log into the pi using SSH in OSX type
SSH pi@IP Address
and use the password “raspberry”
6. type
sudo raspi-config
Change User Password – Follow Prompts to set a new password
Localisation Options – set your timezone and wifi country which will be assigned depending on the IP address jiofi.local.html service provides you.
Interfacing options > Serial – Turn OFF serial prompt but turn ON Serial Hardware
Interfacing options > VNC – Disable VNC Server as using tightVNC
Exit raspi-config and reboot when prompted.
sudo apt-get update sudo apt-get upgrade -y
Configure VNC:
1. to Install VNC Viewer type
sudo apt-get install tightvncserver
2. If you want to change the VNC port type
sudo nano /usr/bin/vncserver
find the line
$vncPort = 5900 + $displayNumber;
and change 5900 to the port you want to use, I use 59000 which equated to 59001 in real life. Press Ctrl>X, Y, Enter to save and exit nano
3. To make VNC run from boot you need to create a script, type
save and exit nano, reboot and VNC should now run from startup!
4. You can now connect to your Pi using VNC! so VNC into your Pi and set a static IP using the network settings GUI in the top right of the screen and reboot, the next few steps can be done through SSH or terminal in VNC its up to you.
Configure Webserver and PhpMyadmin:
As I am initially only using the RPi to collect sensor data and write it to an external mysql table and web server I have skipped this step but left its heading in.
I used my Synology NAS and installed MariaDB and web station (Apache)
Setup Shares:
1. we are going to setup samba shares to make moving scripts etc easier, so install samba
sudo apt-get install samba samba-common-bin -y
2. once installed type
sudo nano /etc/samba/smb.conf
scroll down and make sure you have the correct workgroup (I just use WORKGROUP) and that Wins Support is enabled.
3. to be safe you should only add your pi user so type
smbpasswd -a
and enter your desired password, if you do want to add the root user type
5. You should now be able to connect to these shares using standard UNC paths from your windows or macintosh computers
Setup the “Slice of Radio” (Wireless message bridge)
Because of a change to the way the Pi 3 uses Uart, we need a workaround to get the Slice of radio working.
1. type
sudo nano /boot/config.txt
and add
# Change device tree to enable slice of radio

dtoverlay=pi3-miniuart-bt
to the end of the file then reboot
sudo reboot
If you haven’t installed your slice of radio yet, shut down your Pi and fit it
sudo shutdown 0 otherwise reboot the Pi sudo reboot
3. next we need to setup your radios, If you’ve already done this skip to step 5 otherwise dowload launchpad from github and copy it to your pi, this is a collection of gui python scripts used to configure your wireless sensors. I have put mine in home/pi/launchpad using vnc in terminal run
gksudo python LaunchPad.py
to fire it up. (using gksudo rather than sudo fixes display 0.0 errors caused by running X programs on VNC, you may not need this if using a monitor.)
4. In LaunchPad, Click on message bridge and hit start wait a minute, then click on Configuration wizard (If this is a rebuild rather than fresh install you can skip configuration and just install minicom to check the sensors are responding)then select “serial” in the next window you can configure your sensors, press the configure button on a sensor for one second, wait for it to communicate with wireless bridge and follow the on screen setup, repeat for each sensor. Once you are finished exit LaunchPad
5. next we install minicom to test communication with your sensors is working correctly so type
sudo apt-get install minicom -y
once installed we need to run
minicom -b 9600 -o -D /dev/ttyAMA0
This will open minicom and if all is well you will see your sensors responding, remember they will only report as often as you have told them to so you may need to be patient! Exit minicom when you are happy that the sensors are responding.
Ctrl A, X
BACKUP your SD Card:
At this point I’d recommend backing up your SD card image and archiving it, also I would suggest a Cron job to backup any scripts you write to an external destination.
Summary
That is kind of it for configuration, you now have a Pi 3 running the latest Raspbian, you have sensors attached and reporting,.
Originally I followed this project to get me going http://www.lourenco.eu/temperature/instructions.html but I have since ditched it in place of my own version.
I recently discovered the Synology community which contains some excellent packages to enhance the capability of a Synology NAS however although listed the “beets” package doesn’t appear on my DS215j so after doing some digging and figuring out an easy way to install it I thought I’d share that knowledge.
I take no responsibility for damage to your system I am just sharing what I have learned.
First using package centre ensure python is installed on your NAS (I am using “python” from the community repo but “python3” should work aswell) and that telnet (not recommended) or SSH access is enabled.
Once this is done you can install beets by typing sudo pip install beets then install requests (for fetchart to work) by typing sudo pip install requests
beets is now installed, to check its working type beet version this will return the beets and python version numbers and any active plugins (There won’t be any yet!)
Next we need to edit the beets config type beet config -p this will tell you the location of the config file you’ll need to copy this and edit it off the synology to edit it.
type cp /var/services/homes/admin/.config/beets/config.yaml /volume1/music/config.yaml to copy the blank file into the music folder, using my PC I edited the file to contain this: (You will need to edit this to reflect your folder structure and where you want the files to live!)
Once edited save the file on the NAS in “music” and run the following cp /volume1/music/config.yaml /var/services/homes/admin/.config/beets/config.yaml this will overwrite the blank config file with the one in “music”.
You can now import your files, I have around 100GB of music in /volume1/music/old so I ran beet import /volume1/music/old -qg this automatic import took a long time (Several hours) and imported around 45GB of files, running beet import /volume1/music/old -qg imported another 10GB relatively quickly (A couple of hours)
Unfortunately once the Autotagging has run you’ll need to do a manual import and search to import the rest of the files using the command beet import /volume1/music/old once this starts you will be prompted to import media, unfortunately this process in laborious but its the price you’ll pay for an organised media collection. The one really useful feature missing from beets would be for an option to automatically skip duplicates but prompt for everything else!
Here is my latest acquisition (RCA 323B), I sold the Cortina and bought this 64 Econoline, its the second I’ve owned and was originally a 240ci straight six with a 9″ rear but is now a 302 V8 with C4 automatic from a Mach 1 Mustang.
I have been working to finish it, make safe and do a good job of. It’s taken a hell of a lot longer than I expected for a “running road legal vehicle” but there was so much that needed doing/redoing to make it safe, I’ve pretty much finished the engine mechanical side but it still needs allot of work and at some point an interior and paint.
Here are a few pictures, it’s pretty bare atm with little to no interior but it goes like a rocket and is noisy as all hell it came in on its US plate (58 129 T).
After all the issues migrating Wheezy over I decided to start from scratch with the Pi 3 and my wirelessthings sensors. This guide is pretty poorly written but is step by step everything I did. it assumes you have no mouse, keyboard or monitor attached.
This post is correct as of the 9th of april 2016
Prepare the Pi:
1. Download the latest Raspbean Jessie Image and Using your favourite method, prepare your SD card using the downloaded image for the Pi (I used Apple Pi Baker other GUIs are available).
2. Plug an ethernet cable into the Pi and connect to a router serving DHCP and Boot your Pi using the newly prepared SD card.
3. Using a network scanner (or login to your router) to determine the IP address of your Pi, I use fing on my smartphone.
4. Log into the pi using SSH in OSX type
SSH pi@IP Address
and use the password “raspberry”
5. type
sudo raspi-config
select Internationalisation Options and set your timezone then go into Advanced options and turn ON serial! Exit raspi-config and reboot your Pi when prompted
It is good practice to expand your filesystem at this point however I haven’t found raspi-config GUI very good at this so run:
raspi-config --expand-rootfs and reboot when finished
6. SSH back into your pi run:
sudo apt-get update sudo apt-get upgrade -y
7. Change the default password! type
passwd
and enter your old password followed by your new one as prompted!
Configure VNC:
1. to Install VNC Viewer type
sudo apt-get install tightvncserver
2. If you want to change the VNC port type
sudo nano /usr/bin/vncserver
find the line
$vncPort = 5900 + $displayNumber;
and change 5900 to the port you want to use, I use 59000 which equated to 59001 in real life. Press Ctrl>X, Y, Enter to save and exit nano
3. To make VNC run from boot you need to create a script, type
save and exit nano, reboot and VNC should now run from startup!
4. You can now connect to your Pi using VNC! so VNC into your Pi and set a static IP using the network settings GUI in the top right of the screen and reboot, the next few steps can be done through SSH or terminal in VNC its up to you.
If you haven’t installed your slice of radio yet, shut down your Pi and fit it
sudo shutdown 0 otherwise reboot the Pi sudo reboot
3. next we need to setup your radios, If you’ve already done this skip to step 5 otherwise dowload launchpad from wirelessthings and copy it to your pi, this is a collection of gui python scripts used to configure your wireless sensors. I have put mine in home/pi/launchpad using vnc in terminal run
gksudo python LaunchPad.py
to fire it up. (using gksudo rather than sudo fixes display 0.0 errors caused by running X programs on VNC, you may not need this if using a monitor.)
4. In LaunchPad, Click on message bridge and hit start wait a second, then click on Configuration wizard (ignore the message stating “Message bridge not found”) then select “serial” in the next window you can configure your sensors, press the configure button on a sensor for one second, wait for it to communicate with wireless bridge and follow the on screen setup, repeat for each sensor. Once you are finished exit LaunchPad
5. next we install minicom to test communication with your sensors is working correctly so type
sudo apt-get install minicom -y
once installed we need to run
minicom -b 9600 -o -D /dev/ttyAMA0
This will open minicom and if all is well you will see your sensors responding, remember they will only report as often as you have told them to so you may need to be patient! Exit minicom when you are happy that the sensors are responding.
Ctrl A, X
BACKUP your SD Card:
At this point I’d recommend backing up your SD card image and archiving it:
Apache2 optimisation:
you can disable unused modules to speed up apache2, I disabled these but it’s made no difference.
Thats kind of it for configuration, you now have a Pi 3 running the latest Raspbian, you have sensors attached and reporting, you have a webserver installed, mysql, php and python so you can do with it what you like!
Originally I followed this project to get me going http://www.lourenco.eu/temperature/instructions.html but I have since ditched it in place of my own version.
Originally a 1600L this car had a 2ltr Sierra engine and type 9 gearbox professionally fitted around 10 years ago. Its a nippy car that Runs perfectly with a progresive webber and stainless exhaust.
Its stock height and besides the inertia seatbelts its the Original Interior, they are also the original wheels.
The suspension has been poly bushed and it has adjustable tension Gas Shocks fitted giving it great road handling compared to the standard cortina, however its still really comfortable for day to day driving.
It is in great condition generally and has been resprayed at some point in its life, it does need a small repair to a wing, one sill and rear arches (not MOT fails) but it comes with brand new sills and rear arch repair panels, I had planned on getting these done but never got round to it as they really aren’t that bad.
Located in North Hertfordshire
Manage Consent
To provide the best experiences, we use technologies like cookies to store and/or access device information. Consenting to these technologies will allow us to process data such as browsing behavior or unique IDs on this site. Not consenting or withdrawing consent, may adversely affect certain features and functions.
Functional
Always active
The technical storage or access is strictly necessary for the legitimate purpose of enabling the use of a specific service explicitly requested by the subscriber or user, or for the sole purpose of carrying out the transmission of a communication over an electronic communications network.
Preferences
The technical storage or access is necessary for the legitimate purpose of storing preferences that are not requested by the subscriber or user.
Statistics
The technical storage or access that is used exclusively for statistical purposes.The technical storage or access that is used exclusively for anonymous statistical purposes. Without a subpoena, voluntary compliance on the part of your Internet Service Provider, or additional records from a third party, information stored or retrieved for this purpose alone cannot usually be used to identify you.
Marketing
The technical storage or access is required to create user profiles to send advertising, or to track the user on a website or across several websites for similar marketing purposes.